User guide
How to use QVideo8
QVideo8 is a professional multitrack video digital audio workstation for serious musicians. Your mics, your interface, and a real multitrack mix, with 10 tracks recorded, up to 8 on screen. Each track is filmed at the same moment you record it, in the same take. The camera captures the actual performance behind every track, so it's seen as well as heard. For one-man bands, musicians on screen, and DJs and performers who record and film their sets in the studio, or wherever creativity inspires you.
Start with Getting Started, then take the lessons in any order.
Getting started
You can record your first video in about ten minutes.
What you need
- Mac Apple silicon, running macOS 15 (Sequoia) or later
- Audio A microphone or USB mixer
- Camera Built-in, a USB webcam, or an iPhone
- Headphones Wear them while recording
Cameras that work: the Mac's built-in camera, a USB webcam (4K is fine; QVideo8 records at up to 1080p, 30 fps), or your iPhone as a wireless camera through Continuity Camera. No cables, no extra apps.
First launch
macOS asks to let QVideo8 use the microphone and the camera. Click Allow for both.
Clicked Don't Allow? Open (and ) and switch QVideo8 on.
Your first video, step by step
-
Make a project
Click + in the toolbar, or press ⌘N. Projects save themselves in Movies → QVideo8 Projects.
-
Choose what you hear and record
In the Mixer, set Audio Input to your mic or mixer and Main Output to where you listen (your headphones, or the mixer's headphone jack).
-
Give the track an input
On Track 1's header, open the In menu and pick the input your mic is plugged into (In 1, In 2…).
-
Turn on its camera
Click the camera button on Track 1's header so it turns purple. Check the picture in Camera & Switcher.
-
Arm the track
Click R on Track 1. Its meter shows your input. Play or sing to check the level.
-
Set the tempo and click (optional)
Type a tempo or tap Tap in time, and switch on Click and Count-in if you want them. The click is heard only by you, never recorded.
-
Record
Press the record button in the transport. Perform, then press Space to stop. The take appears on Track 1 with its sound and picture.
-
Play it back
Press Return to go to the start, then Space to play.
-
Add more tracks
Turn Track 2's camera on, arm it, and play along with Track 1. The camera films that take while you record it. Repeat for the next parts: 10 tracks recorded, up to 8 on screen.
-
Make the video
Click Mixdown…, choose 16:9 or 9:16, and render. Free video mixdowns are 720p with the QVideo8 logo in the corner. QVideo8 Pro is 1080p, with no QVideo8 logo. Audio-only mixdowns are full quality. The finished MP4 lands in Movies → QVideo8 Mixdowns unless you choose another folder.
Tip. Wear headphones while recording. With speakers, the playback gets recorded again by your mic.
The window at a glance
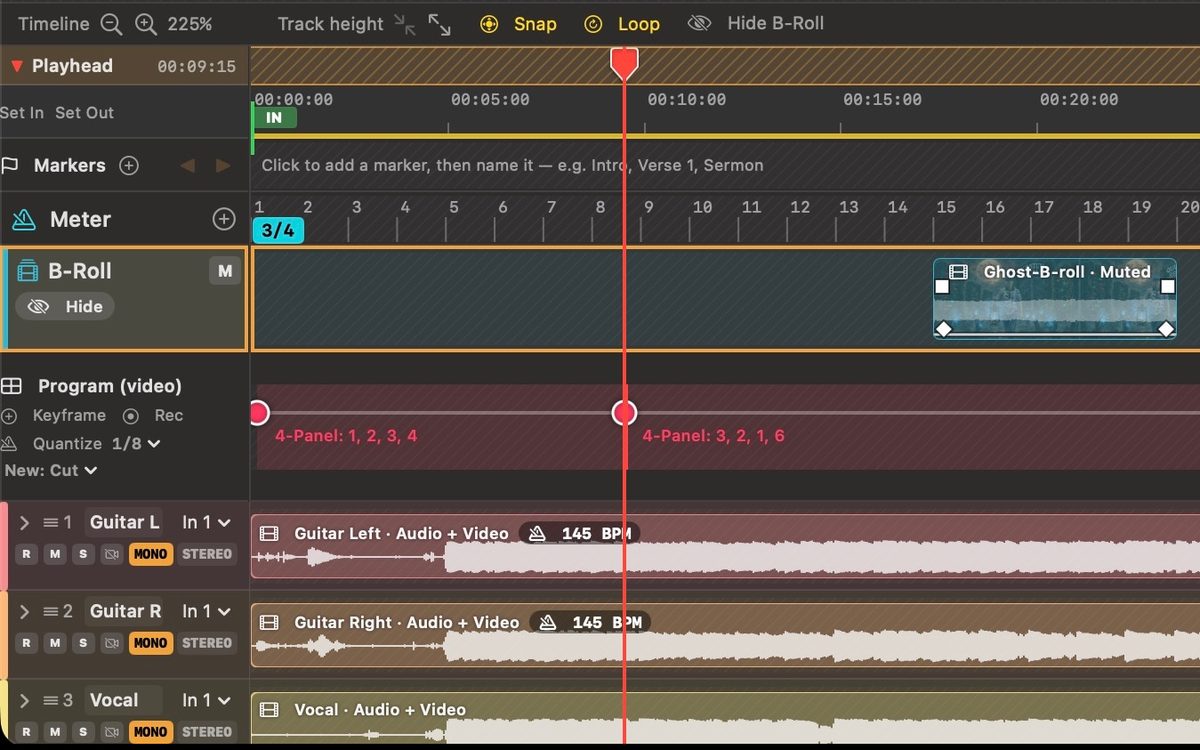
The main window has a toolbar, a transport bar, and two tabs: Mixer & Tracks and Camera & Switcher. Any pane can also open in its own window (Pop Out, or the toolbar buttons), which is handy on a second screen.
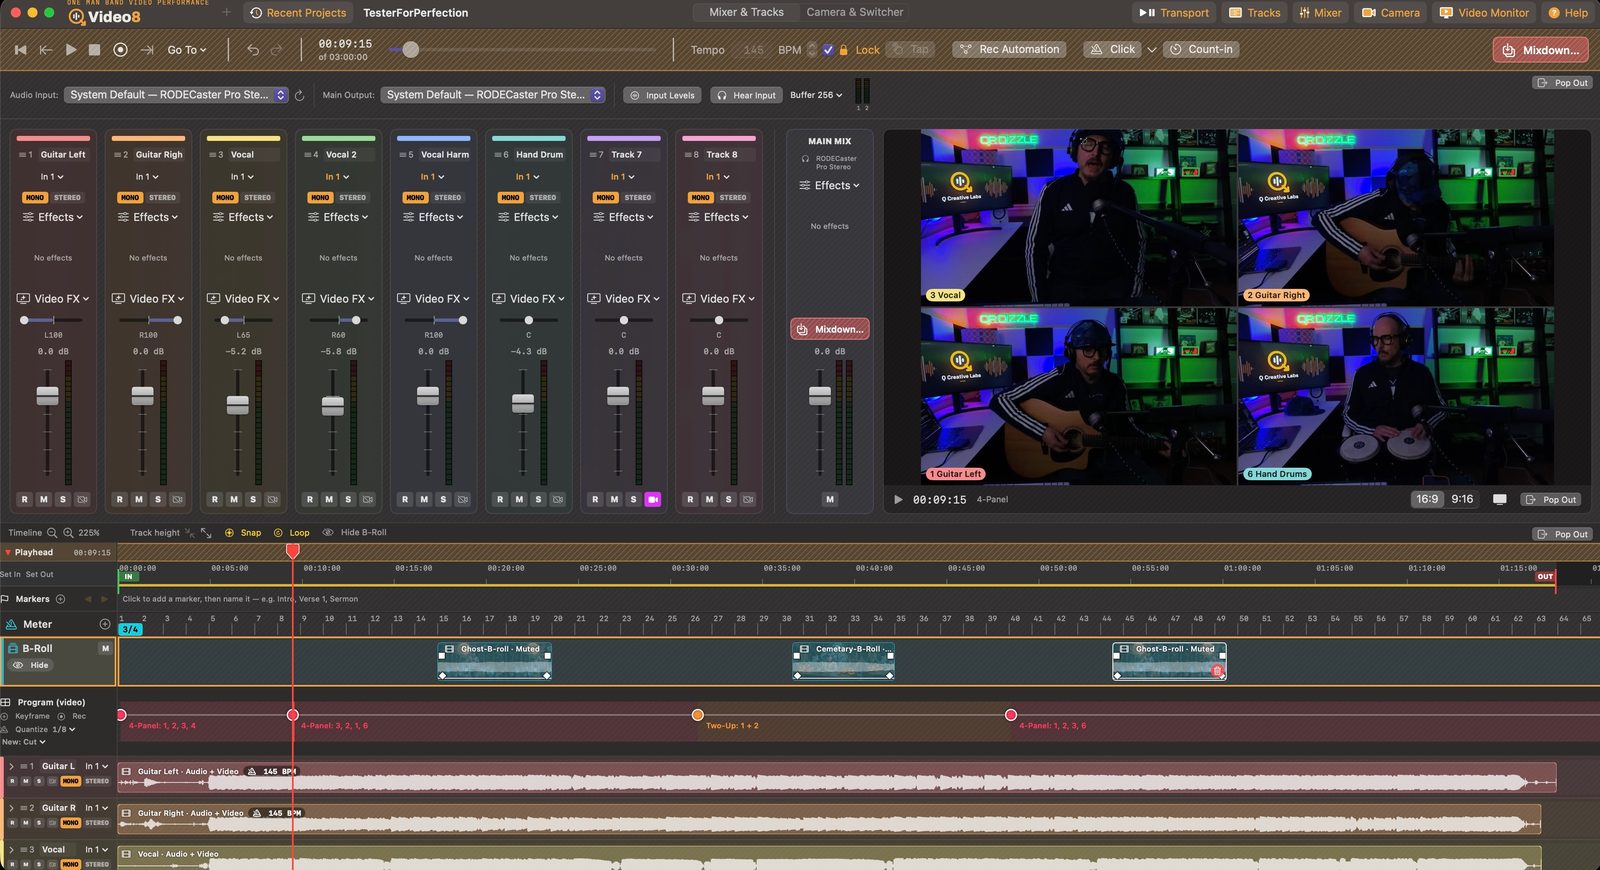
| Toolbar | New project (+), Recent Projects, the project's name, and buttons that open Transport, Tracks, Mixer, Camera, and Video Monitor windows. |
|---|---|
| Transport bar | Go to start, previous / next marker, play, stop, record, Go To, Undo / Redo, the time, tempo and Tap, Rec Automation, Click, Count-in, and Mixdown… |
| Mixer | Audio Input, Main Output, Input Levels, Hear Input, and Buffer. A strip per track with input, MONO / STEREO, effects, video effects, pan, and fader. The Main Mix. The Video Monitor sits beside it when there's room. |
| Tracks (timeline) | Everything over time, in rows (below). |
| Camera & Switcher | Camera choice and Live Preview, the switcher's layouts and keyframes, Video FX switches, the logo Overlay, the B-Roll list, and the Program Preview. |
| Video Monitor | The finished picture, big, as the mixdown will show it (⌘M). |
Timeline rows, top to bottom:
- The orange Playhead strip
- The ruler, with the green IN and red OUT flags
- Markers
- Meter (time signatures)
- B-Roll
- Program (video), for camera switching
- Tracks 1–10
Each track can unfold automation lanes beneath it.
Lesson 1: Audio setup
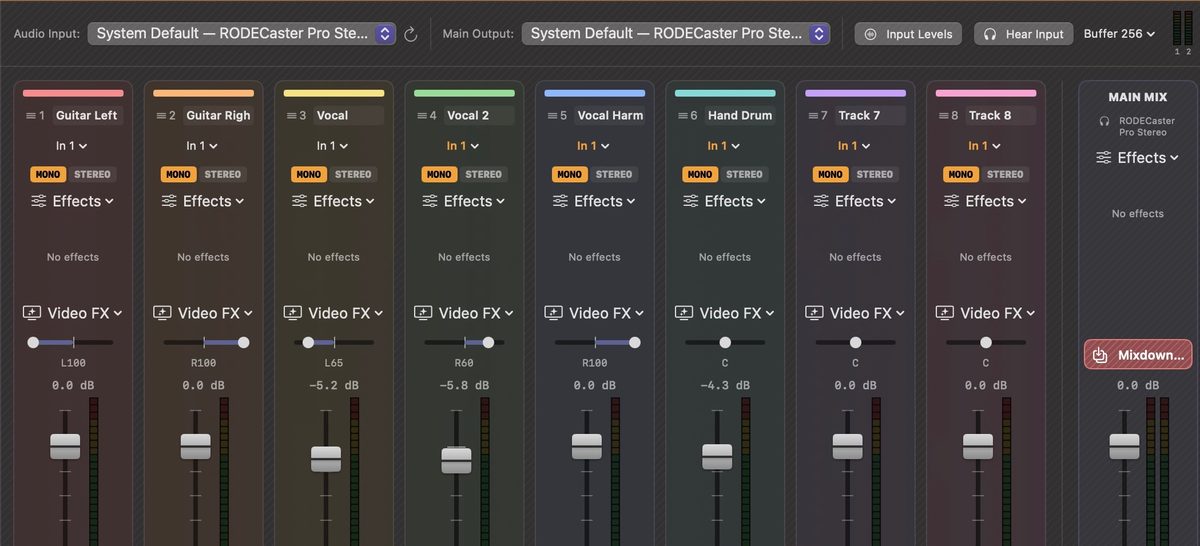
All tracks record from one audio input device, and the whole mix plays through one output. Both are chosen in the Mixer's top row.
- Audio Input
- Your mic, USB mixer, or interface. System Default follows whatever macOS uses. Plugged something in? Click ↻ next to the menu to rescan.
- Main Output
- Where you listen. Pick a mixer by name to hear the mix through its headphone jack. A second menu then chooses which pair of its outputs (Outputs 1–2, 3–4…) carries the mix. With System Default the mix plays on outputs 1–2.
- Input Levels
- A meter for every channel of the input, so you can see which number each mixer channel arrives on.
- A track's input
- Each track's In menu picks one channel (In 1, In 2…). Several tracks can share one.
- MONO / STEREO
- Each track has both buttons. A stereo track can take any two inputs (two mics on a kit, say) as left and right, shows two meters, and has two pans. A warning appears when those two inputs carry the same sound. Importing stereo audio sets the track to stereo.
Hearing yourself while you record
Hear Input plays the armed track's input live in your headphones, at that track's fader level and pan.
Headphones only. With speakers, Hear Input feeds back.
Mixer or interface with more than two inputs. It has its own zero-delay headphone output, so Hear Input turns itself off. Listen through the mixer instead.
Buffer (next to Hear Input) sets how much audio is held back to play smoothly: 64, 128, 256 (recommended), 512, or 1024 samples. Smaller means less delay. Larger is safer from crackles. It applies to playback and recording too.
Crackles or dropouts? Go up one buffer size. Recordings line up correctly at any size.
Lesson 2: Recording
You record one track at a time, playing along with the tracks already recorded. Each take saves itself, sound and picture, as soon as you stop.
-
Arm one track
Click its R button. Only one track is armed at a time. Arming another disarms the first.
-
Camera on for the take
The camera button on the track header films this take while the audio records (purple means on). The picture is the performance you are playing, not a film added afterward. Leave it off only for an audio-only track.
-
Choose the shape
16:9 or 9:16 is set beside the Program Preview in Camera & Switcher, or in the Mixdown window. The camera records to match.
-
Set the tempo and click
Type a tempo (20–300 BPM) or tap Tap along with the music. The Click menu sets the time signature, the click sound, its volume, and the count-in length. Click sounds:
- Rim Click
- Shaker
- Soft Wood
- Tick
- Woodblock
-
Count-in
Count-in plays clicks before recording starts, even when the click is off.
-
Record
Use the transport's record button. Press Space to stop and keep the take.
Recording over something. A new take replaces whatever it covers on that track. Undo (⌘Z) brings the old one back.
Replacing only the sound under a video. Unlink the clip (Lesson 3), delete its audio, turn the track's camera off, then record. The new sound links to the picture already there.
Cameras
Pick the camera in Camera & Switcher. Your iPhone can be that camera, wirelessly, through Continuity Camera. No cables, no extra apps. QVideo8 records that picture at up to 1080p, 30 fps. It keeps its own picture upright, and 9:16 uses the middle of its frame.